Using PowerCLI to Install vThunder
What is VMware PowerCLI?
VMware PowerCLI is a command-line and scripting tool built on Windows PowerShell and provides more than 600 cmdlets for managing and automating all aspects of vSphere management including network, storage, Virtual Machine, guest OS along with executing tasks for vRealize Operations Manager, vSAN, NSX, VMware Cloud on AWS, and VMware Horizon environments.
PowerCLI is a collection of Windows PowerShell modules which are used to manage and maintain a VMware virtual environment. Supported platforms for VMware PowerCLI include Windows, MAC and Linux.
Why Deploy vThunder Using PowerCLI?
A10 offers a virtualized deployment option of the Thunder series, called vThunder®. These software appliances are secure application services that serve a wide variety of application requirements and workloads on virtual infrastructure. It supports the popular hypervisors including:
- VMware ESXi
- Microsoft Hyper-V
- KVM
- Public cloud infrastructure such as AWS
Deploying vThunder using powerCLI removes the need of accessing the vSphere Client and then deploying a VM.
Automation with PowerCLI Scripts
Complex powerCLI scripts can be created for automating the process of vThunder deployment based on certain pre-defined parameters.
Examples use cases for PowerCLI
- vThunder OVA file is not being deployed using the “Deploy OVF” wizard in VMware vCenter Server
- For automation purposes
- For VM performance reporting
- Environment check and reporting
Common PowerCLI commands
Get-helpdisplays information about PowerCLI concepts and commandsGet-Membergets the members, the properties and methods, of objectsConnect-VIconnects to a vSphere serverGet-ResourcePoolretrieves the resource pools available on a vCenter Server systemGet-VMretrieves the virtual machines on a vCenter Server systemGet-VMhostretrieves the guest operating systems of the specified virtual machines
1. Install VMware PowerCLI
Please refer to the following articles for deployment of VMware PowerCLI libraries for different operating systems respectively since the installation is out of scope of this article.
Installation on Windows:
Installation on MacOS:
Installation on Linux:
- Installing PowerShell Core on Linux
- Then on the on Powershell command line, enter:
Install-Module -Name VMware.PowerCLI -Scope CurrentUser
2. Download vThunder OVA
Go to the A10 Downloads page and download a copy of the vThunder ESXi.ova file.
3. Connect To vCenter From PowerCLI
Next we will be installing the vThunder VM on VMware ESXi using VMware PowersCLI. In this example we will use PowerCLI on Windows to show the vThunder installation. The steps are the same for Mac and Linux installations.
Open PowerCLI console using an administrator account and execute the following to connect the PowerCLI console with vCenter Server with the following command:Connect-VIServer VCENTER_IP_ADDRESS
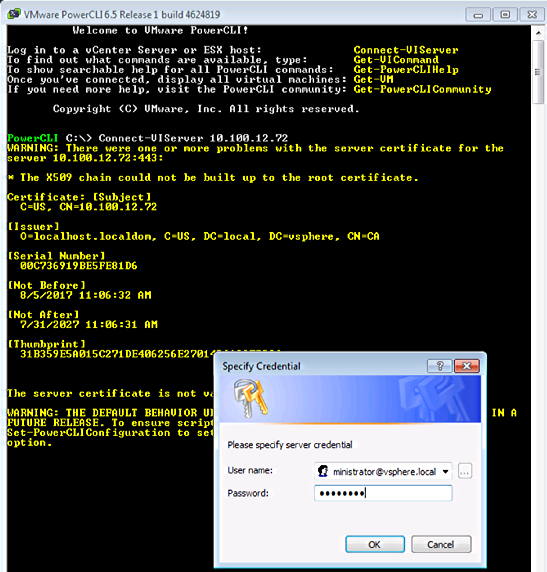
Connecting vCenter from PowerCLI console
After successful authentication, you will see the following prompt:

Connecting vCenter from PowerCLI console
4. Set OVA Parameters
The following OVA parameters, some of which are optional, can be defined through PowerCLI.
$vmSourceSource path of the OVA file$vmHostESXi host where the OVA will be deployed$vmDatastoreDatastore where the VM’s files will be stored$vmNameName to be assigned to the VM
You also will configure the two main vThunder OVA properties as shown in the section OVA Configuration.
$vmSource
The source of the vThunder VM to be deployed is the local path to the OVA. This is the command to set the location of the OVA file to a PowerCLI variable called $vmSource which will be used in later steps:$vmSource = "C:\Users\Administrator\Downloads\vthunder-414-b211-vmtools.ova"
$vmHost
We need to define the ESXi host where the vThunder VM will be deployed. This is achieved by first fetching the list of all ESXi hosts that are registered with vCenter by executing the command Get-VMHost as shown below.
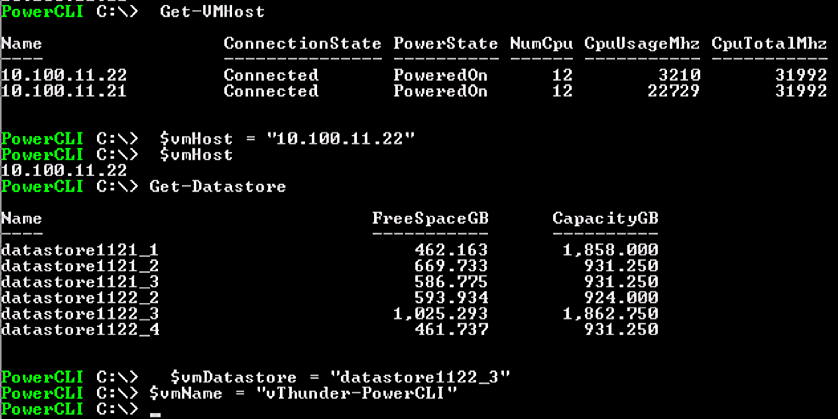
Listing of ESXi hosts and Datastores available to vCenter
To select a particular ESXi host from the list we will use another variable called $vmHost. Please note these names are locally significant and are in no way related to how PowerCLI operates.
$vmDatastore
Similarly, we select the datastore required for storing vThunder VM files by first fetching the list of datastores attached to the vCenter (Get-Datastore) and then putting the one we selected from the list, into another variable called $vmDatastore.
$vmName
In our example we have selected the name vThunder-PowerCLI as shown in the screen shot.
OVA Configuration
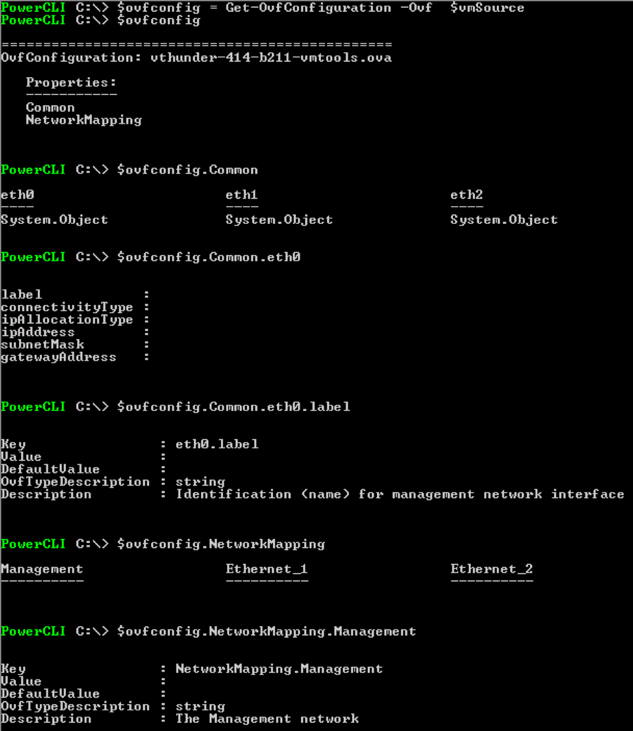
Define the OVA file configuration through PowerCLI. vThunder OVA has two properties:
- Common – Configures the network interface properties with “eth0″ being the management interface by default:
- IP Allocation Type – Static or DHCP IP allocation.
- IP Address
- Subnet Mask
- Gateway Address
- Network Label (Optional)
- Connectivity Type (Optional)
- Network Mapping – This contains configuration related to vCenter’s Distributed switch portgroup that will be connected to the VM’s network adapters (vNIC)
We can check the above properties available in the OVA file by issuing the command Get-OvfConfiguration on the PowerCLI console. Since we are going to modify them for our deployment, we are going to save the list of configuration options in a PowerCLI variable $ovfconfig.
The screenshots below show the various options available under the “Common” and “Network Mapping” properties of the OVF.
Setting OVA properties
Next, we need to assign to the vThunder VM a network port, for network connectivity, which resides on vCenter’s distributed switch. Issue Get-VDPortgroup to list the distributed switch port groups available on vCenter to be assigned to the VM. We need to then assign the selected port group to the vNICs as shown below:

Setting OVA properties
This command only works for the distributed switch’s port groups and will not fetch standard switch’s port groups. For deployment involving standard switch ignore the Network Mapping configuration for all the interfaces and proceed with the next step of deploying the OVA. Once the VM is deployed and powered on you can then manually configure the interface properties by logging into the VM.
5. Deploy OVA
After the properties above are all configured, issue the following command to start the deployment of the VM from powerCLI command prompt:
Import-VApp -Source $vmSource -OvfConfiguration $ovfConfig -Name $vmName -VMHost $vmHost -Datastore $vmDatastore -Confirm:$false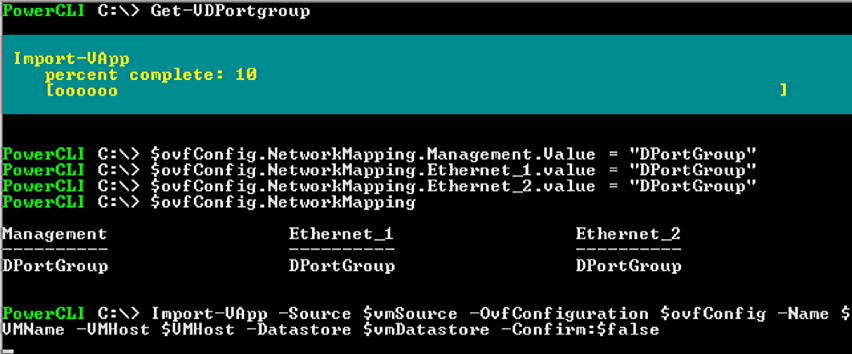
Deployment of the OVA file
PowerCLI will send the VM deployment request to the attached vCenter and the same can be seen in vSphere client or Web Client “Recent Task” section:

Deployment of the OVA file
6. Edit Any Remaining Settings (Optional)
As mentioned above, in the “Network Mapping” OVF properties sections, the port groups that need to be configured can only be of a distributed switch and not of a standard switch. In the case of your vCenter server having only a standard switch, then the network setting can be done after the VM deployment stage. Do this by editing the VM properties and manually selecting the standard switch’s port groups against the VM’s NIC ports.
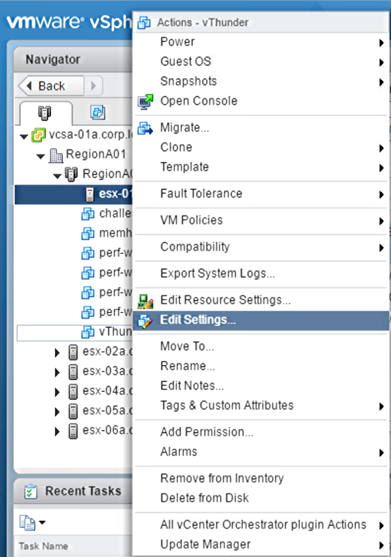
Edit VM’s setting to set the standard switch port group
Additional References
Seeing is believing.
Schedule a live demo today.